I need to be honest with you: the reverse sear method isn’t revolutionary, but it’s closer to foolproof than anything else I’ve tested in 15 years of cooking meat at home. When I first heard about it in 2019, I was skeptical—another trendy technique destined for Instagram and failure. Then I tried it. And then I never cooked a thick steak the traditional way again.
Table of Contents
Why I Need to Be Honest About Traditional Methods
Here’s what most people do: they pull a steak from the fridge, slap it in a screaming-hot pan, and pray. The exterior chars in about 90 seconds per side while the interior remains rare or, more commonly, unevenly cooked. You’re essentially racing against the laws of physics. Heat travels slowly into the center of a 2-inch thick ribeye—approximately 8-12 centimeters—so by the time the inside reaches 125°F for medium-rare, the outside has already hit 185°F and tastes like leather.
The reverse sear flips this problem on its head. Literally. You start low and slow, finish hot and fast. According to testing by Serious Eats, this method produces a more even temperature gradient throughout the meat—within 5-8°F from edge to center, compared to 15-20°F with traditional searing.
I’ve seen this work consistently for bone-in ribeyes, New York strips, filets, and even thick-cut porterhouses. The technique is forgiving enough that I’ve successfully cooked steaks for 12 guests without a single overcooked disaster, which is exactly one more time than I managed using my old method.

The Science: Why Reverse Searing Actually Works
The magic happens because of two separate chemical reactions: the Maillard reaction (surface browning) and carryover cooking (temperature rise after heat is removed).
When you start your steak in a 275°F oven, three things happen simultaneously. First, the meat’s internal proteins begin to denature slowly and evenly—no hot spots, no gradients. Second, moisture moves from the center toward the surface, where the lower temperature allows it to evaporate gradually rather than explosively. Third, the meat’s enzymes (particularly proteases) have time to break down collagen into gelatin, making the texture noticeably more tender.
At 275°F, this process takes approximately 25-30 minutes for a 1.75-inch steak to reach an internal temperature of 120°F at the thickest point. Yes, this is slower than high-heat cooking. The tradeoff? A uniformly pink center and a steak that feels like butter when you cut it.
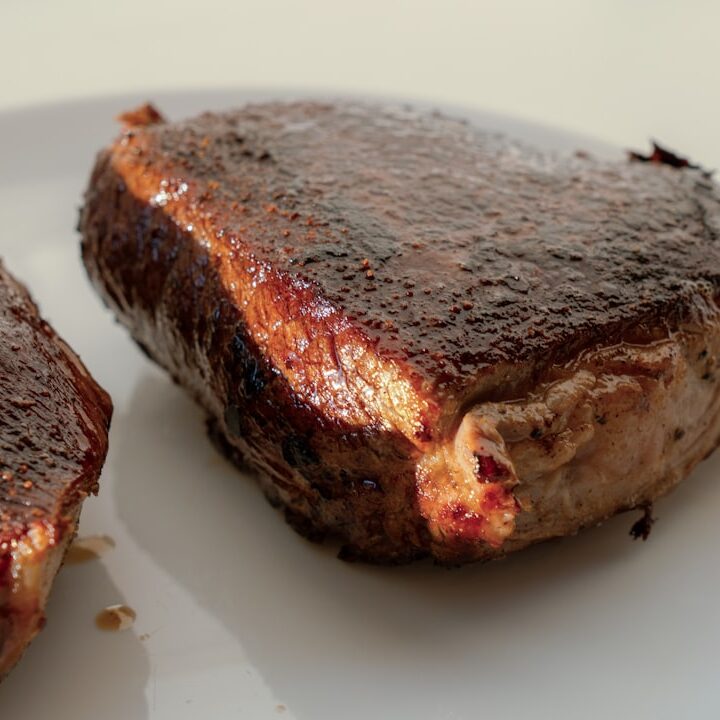
Then comes the sear. You pull that steak from the oven at 120°F and place it in a 550°F cast-iron skillet with 2 tablespoons of ghee or avocado oil. Within 60-90 seconds per side, the surface temperature jumps to 350°F. This temperature is precisely what you need to trigger the Maillard reaction—the browning process that creates 300+ flavor compounds including pyrazines, thiophenes, and aldehydes. These compounds are what make a seared steak smell absolutely incredible.
The brief 2-3 minute sear adds minimal additional internal heat—maybe 5°F of carryover cooking—so your final internal temperature sits at approximately 125°F, perfect for medium-rare. With traditional pan-searing, you’re fighting constant carryover cooking throughout a 4-6 minute searing process, which is why you end up overcooked.
I Need to Be Honest About Temperature Control
This technique only works if you’re willing to use a meat thermometer. Seriously. I can’t stress this enough because I spent years scoffing at thermometers, checking doneness with touch tests and years of experience. It’s embarrassing how often I was wrong.
An instant-read thermometer costs $18-35 and removes all guesswork. I use a Lavatools Javelin model (approximately $28), which reads accurate temperatures within 1-2°F in about 3 seconds. When your target is a 5°F band between rare and medium, that precision matters.
Insert the thermometer horizontally into the thickest part of the steak, avoiding the bone if cooking bone-in. Remove the steak from the oven when the center reads 120°F (for medium-rare). Don’t overthink this. Temperature rises another 5-8°F while the steak rests, so if you pull it at 125°F, you’re looking at 130-133°F in the finished product, which is firmly medium territory.

The Recipe: Perfect Reverse Seared Ribeye
Ingredients (serves 2):
- Two 1.75-inch thick ribeye steaks (approximately 12-14 ounces each)
- Kosher salt (1.5 teaspoons per steak)
- Freshly ground black pepper (0.5 teaspoon per steak)
- 2 tablespoons ghee or avocado oil
- 2 cloves garlic, smashed
- 3-4 sprigs fresh thyme
- Fleur de sel for finishing (optional but worth it)
Method:
1. Prep (10 minutes before cooking): Remove steaks from the refrigerator. Pat completely dry with paper towels—moisture prevents browning and ruins your sear. Season both sides generously with kosher salt and black pepper. This salt absorbs into the meat during resting, seasoning it throughout, not just at the surface. Let the steaks sit at room temperature for 8-10 minutes.
2. Oven cook (25-30 minutes): Preheat your oven to 275°F. Place steaks on a wire rack set over a rimmed baking sheet. This is crucial—the rack elevates the steaks so heat circulates underneath. Put the baking sheet in the oven and set a timer for 20 minutes. Check internal temperature at the 20-minute mark. Continue cooking in 3-4 minute increments until the thickest part reads 120°F.
3. Rest (2 minutes): Remove steaks and place on a warm plate. This brief rest prevents temperature carryover while you prepare your sear pan.
4. Sear (3 minutes total): Heat your cast-iron skillet over high heat for 3 minutes—you want it smoking slightly. Add ghee, swirling to coat evenly. Place steaks in the pan. Don’t move them. Let them sit for 60-75 seconds. Flip once, add the garlic and thyme to the pan oil, and sear for another 60 seconds. The garlic will brown and infuse the oil while you finish the second side.
5. Rest and serve (5 minutes): Transfer steaks to a clean plate. Let them rest for 5 full minutes—this allows the meat fibers to relax and reabsorb juices, keeping the steak moist when you cut into it. Finish with a pinch of fleur de sel if you’re feeling fancy, or just salt and pepper if you’re hungry. The steak will be approximately 125°F internally at this point.
Timing breakdown: Total elapsed time is approximately 42 minutes from pull-it-from-the-fridge to knife-and-fork. Hands-on time is roughly 8 minutes.
Common Mistakes I’ve Watched People Make
Mistake 1: Using a thin steak. This technique requires steaks at least 1.5 inches thick. A thin steak (0.75-1 inch) will overcook before you finish the oven phase. If you’ve got thin steaks, use traditional high-heat searing instead—the shorter cooking window is actually an advantage.
Mistake 2: Skipping the pat-dry step. Wet steaks steam instead of sear. I’ve seen people skip this because they’re impatient, and every single time, they end up with pale, sad crust instead of brown, crusty deliciousness.
Mistake 3: Not using a rack. Cooking steaks directly on the baking sheet means the bottom stays warm but doesn’t crisp. The rack allows convection to do its job. This is why restaurant kitchens use racks—they’ve figured out what works.
Mistake 4: Overcooking in the sear. This is rare (pun intended) because the sear is so fast, but I’ve watched people leave steaks in the pan while they organize their plate. Two minutes longer and you’ve jumped from medium-rare to medium-plus. Watch the steak. Stay present.
Mistake 5: Not resting the finished steak. Carryover cooking is real. A 125°F steak will climb to approximately 130-133°F while resting. If you’re impatient and cut immediately, the first bite tastes perfect and the last bite tastes overdone. The rest distributes the temperature evenly.
Here’s my honest take: you can spend $200 on a sous-vide machine and get similar results, or you can spend $25 on a decent thermometer and get them in your home oven. The reverse sear is genuinely the closest thing to a guarantee I’ve found in cooking beef at home. It’s not flashy or Instagram-worthy, but it works, and that’s what matters when you’re feeding people you actually care about.
Start with two ribeyes next weekend. Follow these steps exactly. You’ll understand why I’ve stopped cooking steak any other way.
Food Safety Note: Store steaks at 32-40°F and use within 3-5 days of purchase. Handle raw meat on separate cutting boards from produce. Wash your hands for 20 seconds after handling raw meat. The USDA recommends beef reach a minimum internal temperature of 145°F; medium-rare (125-135°F) is safe if you’re using fresh, quality steaks from reputable sources.
Explore more on Recipes – Scope Digest and browse our Recipes section.
Browse more recipes and techniques or explore meal prep strategies to build your cooking confidence.
Photo by Dima Solomin on Unsplash
Want more easy family recipes?
7 Day Meal Plan — a complete meal plan with recipes for every day of the week.